September 6, 2011


 I went to the Brightness and Contrast menu again.


Overall, this program is quite "respectable" in terms of what it can do. In terms of pricing, it's only about $ 10.00 US lower than Adobe Elements. I haven't spent enough time with both programs to say which is better, and I prefer not to compare.
As I said before, I didn't find the software that Stuart said came with his Lumix camera, but I decided to try PhotoStudio 6 from ArcSoft.
1. The program did an excellent job in terms of what needed to be done.
2. It has many of the features of that "other program"
3. It's fairly "easy" to learn, however I do have the experience with other software, so that definitely puts me at an advantage for learning.
PhotoStudio 6 By ArcSoft
Back to work for everyone after Labour Day! The good news is that this is only a 4-day week. I received an e-mail from a new friend in Ireland. He had photographed his 2 young boys, but needed to improve the image. Stuart had already suggested that for my other blog (Professional Photography Learning), I talk about the software that actually comes with your camera, especially digital cameras, and not the DSLR. The difference between a DSLR and a digital camera is mostly in not having interchangeable lenses, however that is now changing. The next difference is the smaller size of the digital camera.
I already wrote about ImageBrower that comes with Canon cameras. The software titles that comes with Stuart's Lumix digital camera are:
- Panorama Maker 3 - I assume this allows basic stitching capabilities to create a single panoramic photo
- PhotoBase 4.5 - Not quite sure yet what this does!!
- PhotoImpression 5 - I think this tool gives me the ability to do basic editing
I couldn't find those, but I found PhotoStudio 6 by ArcSoft, so I decided to use that one and do a write-up for today's edition. The first thing that I realized that I've realized before, is that when you work with a particular program (e.g. Microsoft Word or Adobe Photoshop), is that you have an excellent familiarity that transfers readily to another similar program. In other words, if you work with Photoshop enough, then PhotoStudio 6 is quite "easy" to work with.

ArcSoft's PhotoStudio 6 Opening Web Page for Mac

Starting Image

The Opening Window
Upon fast inspection, the window looks very much like Photoshop

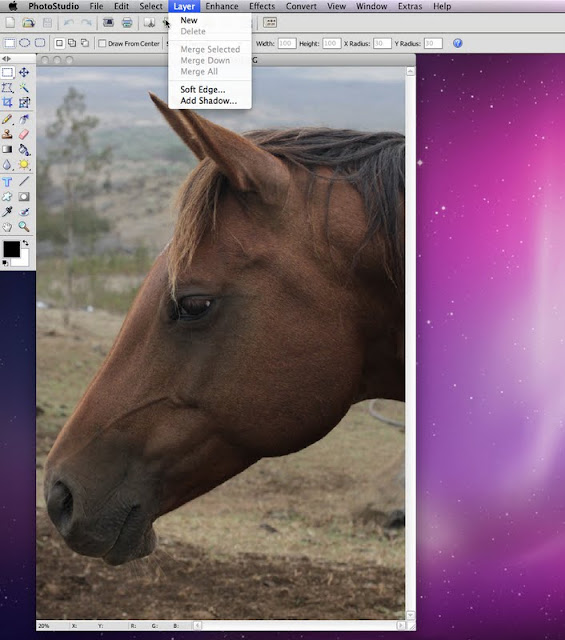
Add a Layer
You always add a layer in order to work with a "copy".
At the end of working with any image, you will "flatten" or "merge layers" as 1 image.

The first step is to create a duplicate layer. This allows you to work on a "copy" rather than the original image. In the final step, you then "flatten" or merge layers. I accidently added a third layer, which I then thew out in the garbage can just below the line at the bottom of the layer menu.

The Layer Window
The "extra" accidental layer went into the garbage

2. Beginning the Improvement
I went to the Enhance menu and then decided to adjust levels.

Levels show you the spread of tones or colour intensites.
The graph should be positioned on the 2 arrows or pointers to the left and right.
Doing this makes for better dark and light tones.
You simply move the arrows to the ends of the graph.

By moving the small arrows, you can "see" how the image has improved.

I then went to the Brightness and Contrast menu and
adjusted for more brightness and better contrast.

I went to the Magnetic Lasso command
This is found on the vertical menu on the left side of the large screen.
The reason for this was that I felt that I'd like to see more detail or information in those dark areas.

I went to the Levels menu
The menu is at the start position, and you can see that the small arrows
do not touch the ends of the graph.

I went to the Levels menu to make an adjustment as before,
by moving the small arrows at the bottom of the levels menu.
Levels show you the spread of tones or colour intensites.

I then adjusted the brightness and contrast a bit.

I noticed a fine line that remained when I removed the dotted lines form the magnetic lasso.
With more time, I'm sure I could have found a way to "soften" the line.
I did find another solution later (Below).

I went to the magnetic Lasso again.
I wanted to make the hairs on the "chinny chin chin" of the horse more sharply-focused.

I did this with an "Unsharp Command".
This is an "easy" command to use for sharpening.
I don;t want to elaborate on this to avoid making this more complicated that needed.

The hairs are now "sharper", but I have that undesirable demarcation line again.
However, I found a solution (Below).

Notice the line that shows where the boundary was.

I went to the rubber stamp command on the left vertical menu.
This softened and rid the problem of the "demarcation line"

The correction is a bit noticeable, but I'm 100% that with had I spent more time,
I would easily have corrected this minor point, and the demarcation line.

The Final Corrected Image

The Starting-Out Image
Overall, this program is quite "respectable" in terms of what it can do. In terms of pricing, it's only about $ 10.00 US lower than Adobe Elements. I haven't spent enough time with both programs to say which is better, and I prefer not to compare.
As I said before, I didn't find the software that Stuart said came with his Lumix camera, but I decided to try PhotoStudio 6 from ArcSoft.
1. The program did an excellent job in terms of what needed to be done.
2. It has many of the features of that "other program"
3. It's fairly "easy" to learn, however I do have the experience with other software, so that definitely puts me at an advantage for learning.
2 comments:
Another good article. Having now played a little with ArcSoft PhotoImpression 5 it appears to be a very basic editing tool. Having witnessed firsthand the impressive results using Photoshop and now PhotoStudio I can really see how these programs soon pay their way.
Stuart
Hi Stuart,
Oops! I was just checking (March 31,2013) for future posts,and I came across your comment.
Thanks for reading. I find that there are lots of photo-editing software, plug-ins, or photo enhancement software (e.g. creative "film effects".
My other blog: www.prophotographylearning.blogspot.com has more posts about software and photography. However, I've come to a standstill since readership is low.
Stacey
Post a Comment