Wednesday, September 21, 2011


Photoshop-Working With Text
One of the features that most software programs have is the ability to add text. Photoshop is no different. I'm sure most of you have worked with a text-editing software such as Microsoft Word, so I won't go into how to use the many variations of the text. I'll just touch lightly on the topic.

1. Open a File

2. Enlarge the File to Fit the Screen
This is easier on your eyes.

3. Press on the icon T on the Left Vertical Menu
T represents the Text Menu

Just an Enlargement of the Command Buttom for Text

The Top Menu Relating to Text Functions

The Top Menu left to Right
The Fonts.....

Next to the Fonts is
the nature of the font (Sharp, strong...)

Font Size

Font Colour

Expanded Font Colour Menu
Positioning of the Text on the Photo
Left, Centre, or Right

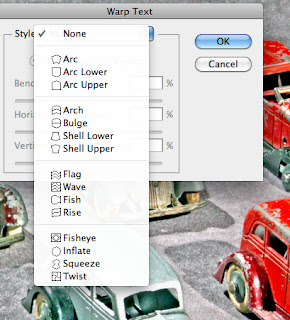
Text Warping Menu
This Sub-Menu Allows You to "bend" the Text

The Expanded Warp Menu

Another More-Detsiled Expanded Warp Menu

The Colour Selection Window
Experiment with your colour selection.
Some colours don't work well as they are hard on the eye (too light or dark),
or they may "clash" with the photo's contents.

After you click on the text icon (left vertical side menu),
your mouse icon becomes a vertical line

Also, a new layer is created and
shows on the right-side menu

Just 1 more text menu

The layers menu on the right side still shows the
photo with 2 layers (the photo and the text).
You will need to merge the files together

At the bottom of the layers menu (Just above you here)
is the "Merge Doswn" command.
When you press this , the layers will merge to 1 layer

Now the layers menu shows you only 1 layer

The Final Image
Don't forget:
Save the new file as something other than the original name!
No comments:
Post a Comment