Saturday, September 29, 2012
Some Photography and Photoshop Learning
I have another blog on Professional Photography whose address is prophotographylearning.blogspot.com
It doesn't attract as many viewers that I'd like, so I'm going to add some of my posts
from there to here. I'm doing this in order to have viewers read new material, and at the same time to assist people who might be selling on E-Bay.
Also, I need you, my viewers to help out by by volunteering to submit your photos and stories to that I can add new material. As you already know, I've temporarily stopped buying and selling toys on E-Bay. So, I need your assistance if I'm to continue writing.
My address is majortrout@hotmail.com
Instructions for those who would like like to help:
1. Send JPEG files at least 4" x 6" (100mm x 130mm) @ 300 dpi (pixels/inch) in colour).
2. Write a small story about the photos that you are sending.
If you need help with what you'd like to write, I can offer you suggestions through the mail. It's not hard, and I'm sure everyone has interesting stories to tell. Where do you find the toys, how did you start collecting, do you restore toys, what's the history of the toy?
I usually can work on the material as soon as I get it.
What I will do, is to give you credit for each and every photo, and add the following:
Copyright 2012 Your Name
Please do not copy without the permission of Your Name
I also will add your name, your e-mailaddress (if you want), your website, and your sellers' ID on E-Bay if that's where you sell your items.
The Green Screen
(Originally posted prophotographylearning.blogspot.com
Thursday, July 4, 2012 American Independence Day
Thursday, July 4, 2012 American Independence Day
You've undoubtedly heard of the technique called green screen, but didn't ever use it, or maybe you didn't know how to use it. Basically, the technique started in Hollywood. The technique is used to "extract" people when photographed against the green screen, and then place them in a new scene.
What you do is light the people with the same lighting (intensity, angle, height) as the new scene. You then film them (movie or still camera), extract them, and then place them into the new scene. So, for example, you could photograph them in the studio, then place them in a gladiator arena, such as in the movie "Gladiator".
The reason the colour green is used is that it's the opposite of magenta, which is a colour close to your skin tone. Thus it's then easy to select the green and then remove the people and their clothing and props from the green.
You usually light the green at least 2 f-stops brighter than the subjects. For today, I did a fast set-up and didn't set the lights for that exposure difference. Also, whatever area is not in the frame (green), you try and use black material or seamless or black cardboard. What this does is to prevent the green from reflecting light into the areas that are going to remove from the green. Later on, I'll explain and give an example of what I mean .
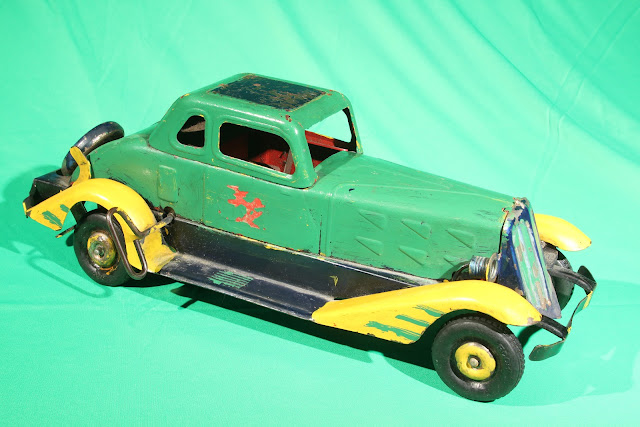
For today's example, I used a newly-acquired Hoge pressed steel car, circa the 1930's.
Here's the Hoge Car on the Green Material
You can purchase an actual "green screen" material on e-Bay, or you can buy material from any wholesale fabric store. Most stores where women buy fabric to sew their own dresses will have such material.
Be sure to go on the net to check out the specific colour of green that you want.
In the above example, the green is overexposed as the car paint was dark, thus the overexposure.
In Photoshop, you'll use the Select >> Color Range Tool
Notice that parts of the car were also selected.
You need to adjust the "Fuzziness" slider to reduce any green colour capture from the use of the Select>>Colour Range.
As you select, you can also use the + or - eyedroppers to add or remove parts of the selection.
Notice in the above screen capture, how I've adjusted the - eyedropper to further remove the dark green shadow under the car side.
IWhen you make the selection, the side panel will show the colour selected.
You'll need to change that to the regular white, otherwise, when you extract the green, it will be replaced with the same green.
To revert to the black and white colours, just press on the green above.
That will bring up a colour window, whereupon you simply select white.
Here is the "extraction".
It's for sure imperfect, but that will happen.
What I'll do now is simply to do another select>>color range
to further remove more unwanted green.
Here is the second stage of selecting green for removal.
Better, but still not "perfect".
From here, I could do another Select>>color range.
Instead, I'll simply use the eraser tool to remove the remaining.
The Final Result.
Ugh! Green Tires
At the beginning of this instalment, I mentioned that you had to add black material,
black cardboard, or black seamless around areas of the car not in the camera frame.
What this does is to prevent the green material from reflecting green into the car.
That's why the tire is green!
So now you know what the green screen technique is all about.
It's a useful skill to know, but if you're good at Photoshop there are 20 other ways to remove the car from the background.
So to all of my American readers, have a wonderful 4th of July.
To the rest of my readers, as always, have a fgreat morning, afternoon, or evening, wherever you are.


No comments:
Post a Comment