June 20, 2011
Photoshop
The Composite Photo Image
This instalment has to do with creating a multi-image composite in order to save money on E-Bay. Right now the toy market is very slow on E-Bay.
The first image on E-Bay to list an item is free. After that, it costs 15 cents more for each extra image.
You can have a "special" of I think 6 images for 75 cents.
Now each time you create a list with several photos, it costs you.
If your item does not sell, you can re-list for free, but only 1 time!
Now if I list 20 items at a time with the "special photo package), then 20 x 75 = $15.00.
Now when I sell an item there is the final fee cost for that as well.
I figured out that if I could make a composite photo, then I could save at least 75 cents on each listing.
1. Open your images in Photoshop. I have 5 of them

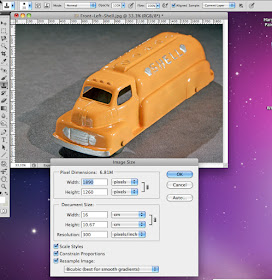
2. Check the Size of 1 image.
In this case, it's 16 cm x 10.67 cm and 300 pixels/inch
SInce I have 5 images, I'd like to make 3 rows of 2 images each.
The last row will only have 1 image.
So I need to make a large new file to be able to hold the 5 images.
3. a. I need to create a new file to hold the 5 images.
b. I go File >New
4. a. I type in the dimensions that I need to make the large new composite image.
b. The new image will be 35 cm x 35.3 cm x 300 pixels/inch
5. I am going to move all 5 small images to the larger image with
the move tool in Photoshop. The red arrow is pointing to it.
6. This is how the 5 images appear after they have been moved.
Notice that a "copy" of each image is moved, and not the original.
7.a. Sometimes, you may not arrange the images neatly.
b. You can have a grid line (vertical and horizontal pattern) appear.
c. This will help you get precise positioning of your small photos.
8. a. Here's the grid.
b. You can make your own "custom grid" with different colour,
thicknesses of lines, and fewer and larger cubes.
9. a. It can get confusing when you have to move 5 or more images.
b. On the right side (that's where I place this Photoshop Menu) is a "layer" menu.
Each time that you place a photo in a new file to make a montage, you get what is called a "layer".
Each layer or photo can be worked with independently, until you are ready to have them all together.
You can see from the layer menu which is the "current" image being worked on. It's in blue.
You can also re-name the layer to Left side, right side,
or turned over Shell truck to identify the layer faster and easier.
10. a. The next step after you've made the adjustments and positioning to the images,
is to "flatten" or "merge down".
b. This flattening or merging down creates 1 "photo image".
It's like you're making a montage by cutting out items from a magazine.
You then take a photo and now have 1 image of all the pieces of the montage.
11. a. Once you "flatten" or "merge down",
you'll notice that the checkered background changes to white.
That informs you that you now have 1 image instead of 5 smaller ones.
b. Make sure to save this file or the next one.
You don't want to spend all this time and then accidently do something that you cannot recover from!
12. a. When I created the large file, I purposely made it a bit larger than the actual sizes of the small files (images) placed side by side and top to bottom.
b. Making the large image larger than necessary, allows me to work faster without having to be too precise!
c. The second command down, on the left menu side is called a "Marquis".
The "Marquis" creates a dashed rectangle and will allow you to "frame" the larger-sized image, and cut off "excess".
13. Above, you can see the "marquis" that is smaller than the large file.
14. a. Once the size is OK, you simply make a "cut" and create a new file.
b. The new file will automatically be the size of the "cut".
c. You will then do "edit" >>paste" to place the cut file in the new one.
15. a. Whenever you create a new file, you have a white layer (background).
b. Pasting the "cut" image, now adds another layer.
c. You have to "flatten" or "Merge Layers" as you did above in step 10.
d. Once you do this step, make sure to save the image. Photoshop will remind you to save the photo, as well as asking you what you want to title it.
16. And now you're almost done!
You'll have to re-size this final image because E-Bay prefers smaller-sized images in the range of no more than 8 MB, and JPEG files. Don't worry. This JPEG file will "shrink" when it is added to an E-Bay listing, and you'll notice that it will be about 1/4 of its' original size (about 2 MB).
And now you're done!
Final Words
1. As usual, if you have any questions, suggestions, or even find some errors,
please feel free to make a comment.
2. Don't worry if you don't "get" everything above right away.
You'll need to do some practising beforehand, but eventually this will be quite "easy".
My e-mail address is
majortrout@gmail.com


No comments:
Post a Comment